Introduction to Content Manager 9.3
Today Micro Focus announced the release of Content Manager version 9.3. Content Manager 9.3 is a governance based enterprise content management system designed to help government agencies, regulated industries and global organizations manage their business content from creation to disposal. Content Manager is the cornerstone of the Micro Focus Secure Content Management Suite that provides customers the capability to lower operating costs, secure information, enhance compliance and increase productivity. Through innovation and interoperability Content Manager is transforming how business manages content across the lifecycle, helping to maintain control over this valuable asset throughout the process of creation, collaboration and mobile access.
By focusing on areas of; automatic classification and policy application – with linked security control, manage-in-place functionality, and feature rich mobile access, Content Manager will help you address areas of cost, compliance, productivity, information privacy and security. Developed with more than 30 years of information management expertise, Content Manager 9.3 is a comprehensive, out-of-the-box software solution and a key component of Micro Focus’ Information, Management and Governance portfolio.
Content Manager 9.3 is designed to the International Standard of Records Management (ISO 15489:2001), and elements of ISO16175: Principles and Functional Requirements for Records in Electronic Office Environments.
New Features
Rebranding
This release of Content Manager introduces a fresh visual style reflecting our new company, Micro Focus. The brand and color palette is aligned with the company’s desire to build a consistent approach to our brand and continue the market leadership of Content Manager on a world-wide basis. With nearly 2,500 customers and more than 2,000,000 licensed users, Content Manager continues to innovate and respond to customer demand and significant market trends

New tasks to update records
A number of new tasks have been added to Content Manager to allow easier updating of record metadata.
Change Title
This option can be access from the record right-click Details – Title menu. It allows users with appropriate permissions to update the title components of a single or multiple records.

Change Record Number
There are two new options in Content Manager 9.3 that allow you to change the record number of records.
If you have made changes to the Record Type numbering patterns or if there has been a restructure which required records to be moved to different Record Types. Content Manager 9.3 now allows the update of the record number of multiple records from the record right-click Administrative Tools – Record Number menu. Using this option will re-number the selected records to match the new numbering pattern, or to re-sequence them to match the numbering of their new Record Type.
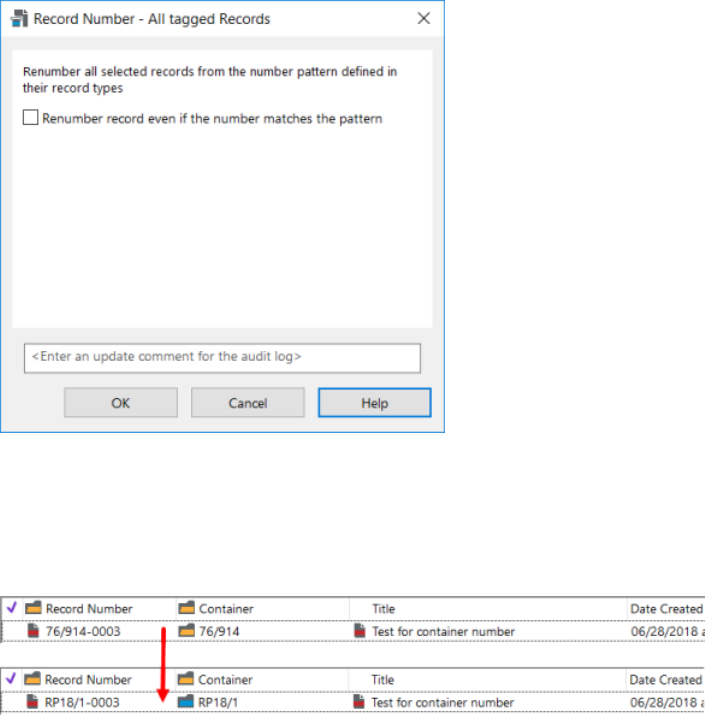
The other option relates to Record Types that are using Container numbering. A new System Option Automatically renumbering a record when moved to a new container has been added in this release. When enabled, if a record that has inherited its number from its container is moved to another container, then its number will be updated to reflect its new container number.
Updating Access Controls on multiple records
When multiple records require their Access Control settings to be customized, in Content Manager 9.3, 3 new options have been added. These options allow you to:
- Add Locations to Access Controls – append the selected Locations to the existing Access Control list.
- Remove Locations From Access Controls – remove the selected Locations from the existing Access Control list.
- Replace Current Access Control List with this list of Locations – replace the existing Access Control list with the new Locations.

New tasks to update Locations
Change Location Type: This option allows you to change the Location Type of a single or multiple Locations to a new Location Type, e.g. changing Locations that are of an Unknown type to a Person type.

The internal status of the Locations can also be updated using this option:
Change Profile Data
Components of Location Profile information can also be updated from a single dialog now. From the Location right-click menu, Change Profile Data, the Profile data that can be updated from this dialog:
- User Type – change the suer permissions for the selected Location(s)
- Accept Logins – update the login permission for the selected Location(s)
- Change Login Domain – update the login domain for the selected
- Change Login Expiry Date – set a Login Expiry date for the selected Location(s)
- Change Use Profile Of – set a Location for the selected Location(s) to inherit their profile details from.

Modify Email Address: The new Location right-click menu Modify Email allows organizations to change the domain component, i.e. @domain.com, of the email address of a single or multiple Locations.
Updating the default Jurisdictions on Locations
The Other Location Fields dialog has a new option added for the 9.3 release, Change default Jurisdiction. This option allows organizations to apply a new default Jurisdiction to Location(s).

View pane panel
We have introduced an option for users to be able to select the location of their View pane. In the Content Manager client, on the View tab, from the drop-down Viewpane option, users can now opt to have the View pane displayed at the bottom of the window (default) or to the right of the window.
ArcSight Integration
As part of the Audit options, Content Manager 9.3 can produce log files in Common Event Format that can be ingested by ArcSight (or other industry standard log ingest systems). The new option, Generate an additional offline audit log using ArcSight Common Event Format, is available on the Administration – Audit – General tab

The Common Event Formatted log is written to the same location as the standard format Audit log, but is prefixed with ArcSight_.
Office Integration
Prior to 9.3, when users Edited a document from the Content Manager client, there was a disconnect between Office and Content Manager in that the Content Manager Office integration options were not enabled. In 9.3, now when using the Edit option, the Content Manager Office integration options such as Check In, Make Final, Check In on Close and Records Properties, will have the same behavior as they do when you open a record from within the Content Manager integrated Office application.
This behavior is available when using the Office Integration with the Content Manager client.
An option to display the Content Manager Properties dialog has been moved to the Content Manger options in the Office application, rather than having to update the installed Preferences configuration file. If this option is enabled the record Properties dialog will be displayed rather opening a record window in the Content Manager client or Web Client. This allows users to easily set the option to suit their working preferences.

Enhanced Features
Rendering improvements
In version 9.2, the Rendering module was redesigned. The Rendering processing was further enhanced in the 9.3 release.
In the Content Manager client a new monitoring view for the Rendering processing has been added. The Monitor Render Queue dialog is available from the Administration tab.
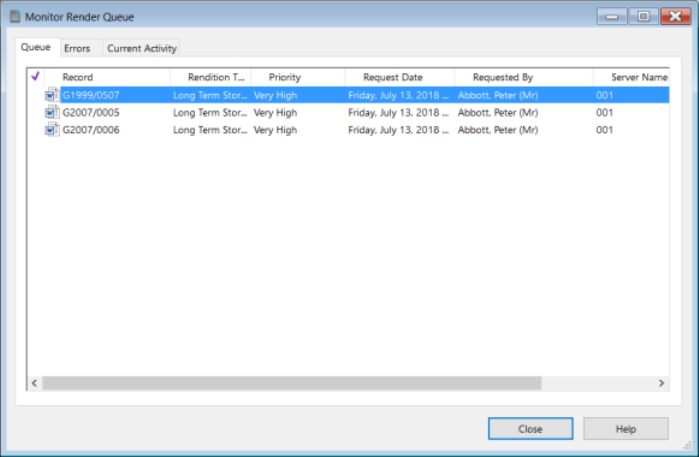
From this dialog, the rendering process can be monitored and errors can be processed.

Two new options have also been added to facilitate the automatic creation of renditions. On the Record Types properties dialog, on the Electronic tab, Content Manager administrators can enable options for renditions to be automatically created for electronic documents that are checked in using specific record types. The two options that can be enabled are:
- Automatically create PDF rendition – enable this option so when an electronic document with a suitable file format is checked into Content Manager, once the document has been transferred to the document store, it will be sent to the Rendering processor and an PDF will be attached as a Rendition to the record.
- Automatically create OCR rendition (for tif, jpg, etc.) – enable this option so when an electronic document with a suitable file format is checked into Content Manager, once the document has been transferred to the document store, it will be sent to the Rendering processor and an OCR format will be attached as a Rendition to the record.
For those organizations using the Advanced Disposal feature and who are using Consignments for their disposal processing. A new option has been added to the General tab on Archive or Transfer Consignments, Render records to long term storage format (PDF). Checking this option automatically creates a PDF rendition for all electronic documents that are associated with the consignment. The Consignment will not be able to be disposed of until all records have been rendered.
NOTE: For the PDFs to be automatically created, an automatic rendition selection for In Flagged Consignments must be created in Enterprise Studio
To facilitate the automatic creation of renditions, in Content Manager Enterprise Studio there additional settings that can be defined to generate specific automatic PDF renditions. On the dataset right-click Event Processing menu, the Rendering option displays the Configure Rendering dialog for the selected dataset. From this dialog, the rendering processes can be suspended, the automatic rendition selections can be defined, as well as configuring the OCR Image processing and DocuSign options.

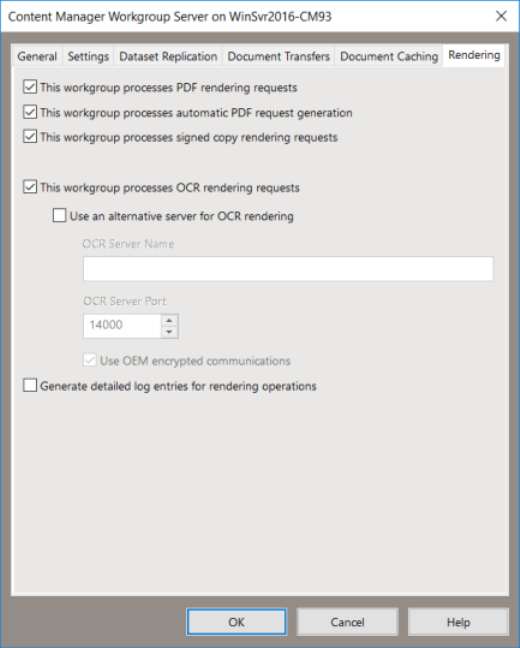
Also in Enterprise Studio, the Rendering processing can be pushed to specific Workgroup Servers. On the Workgroup Server Properties – Rendering dialog, you can flag if a Workgroup Server will be processing specific types of Rendering requests, and/or OCR requests. These options allow you to share out the rendering processes to different Workgroup Servers, if required.
Searching options
To improve usability of the user Search Results options, the search options that were also available on other option dialogs, such as the Search – Options dialog, have been removed.
Document Store Integrity Checks
The Document Store Integrity Check functionality has been improved in this release. When a Integrity Check is run on a Document Store in 9.3, it:
- uses the document hash to ensure the stored document is valid and has not been tampered with.
- checks if the document is missing and restores the document from backup store if a replacement is found (if Correct any errors that are encountered is checked). If it cannot find replacement, it will mark the document as missing.
- checks for the number of documents that had a discrepancy with the reference count (single instancing).
- generates a hash for the document if Generate hash for records that don’t have a stored hash is checked.
IDOL and KeyView
In this release the versions of IDOL and Keyview have been upgraded to version 12.0. Image Server, the component that allows you to complete OCR Image processing, has been upgraded to Media Server version 12.0.
The default query operator for IDOL has been modified to now be AND rather than OR.
For IDOL, this can be modified to be OR by updating the TRIM Content Service.cfg file and commenting out, or removing, the DefaultQueryOperator. See CM9.3_IDOL_DCI_Install_Config.pdf for details.
Elasticsearch
The version of Elasticsearch that is supported in 9.3 is 6.2.x.
NOTE: Due to Elasticsearch enhancements, when upgrading from 9.2 or 9.2 Patch 1 and you are using Elasticsearch for your content index, the Elasticsearch index for the dataset must be deleted and re-created. See the Content Manager Enterprise Studio help file and the CM9.3_ ElasticSearchInstall_Config.pdf for details on how to remove and create an Elasticsearch Index.
If your organization uses the Auto-Classification feature, you will also need to re-run the Classification/Category training
The default query operator for Elasticsearch has been modified to now be AND rather than OR. This cannot be modified.
When configuring an Elasticsearch Content Index, rather than defining the name of the Elasticsearch server and its port number, now you define the Elasticsearch URL. This enhancement allows you to specify the server name and port number or the HTTP or HTTPS in a single string. If you’re using the X-Pack authentication method, it allows you to specify the HTTPS-based URL for the Elasticsearch server here.

The Authentication methods for Elasticsearch have also been enhanced. Now organizations can opt to use X-Pack authentication and/or Amazon Web Services (AWS) authentication.


